The Secret to Lifting Heavy Weights!
If you’ve ever watched people in the heavy lifting section of the gym, you might have noticed two things: they take a massive breath and hold it before a lift, and they often wear thick leather belts. They aren’t just trying to look hardcore, they are using a highly effective breathing technique called the Valsalva maneuver alongside a lifting belt to protect their spines.
As physiotherapists, we often see gym-goers who were taught to “inhale on the way down and exhale on the way up.” While that is fine for light dumbbells or cardio machines, applying it to heavier exercises like squats, deadlifts, or overhead presses can actually leave your lower back vulnerable to injury.
Let’s look at how changing the way you breathe and knowing when to use a belt can keep you safe and strong in the gym.
What is the Valsalva Maneuver?
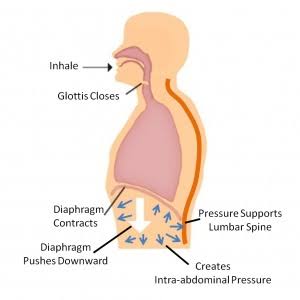
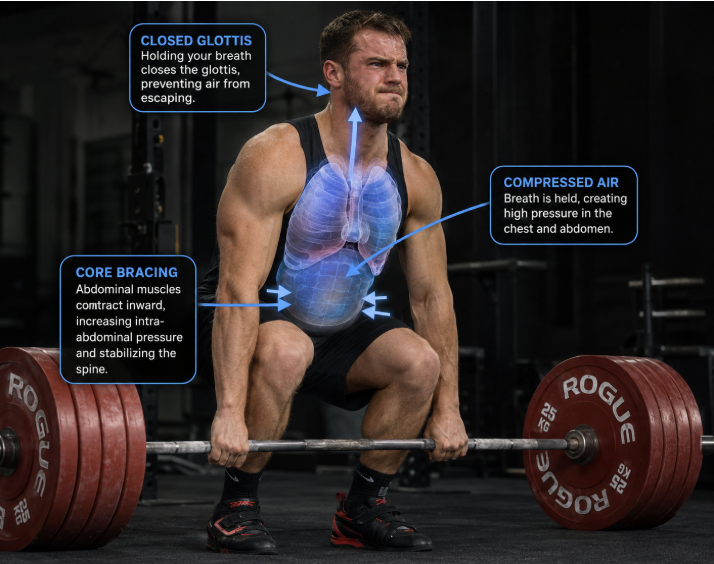
The Valsalva maneuver involves taking a deep breath and holding it by closing your airway (the back of your throat) while you brace your core muscles.
When you trap air in your torso and push out against it, you create an internal pressure chamber. In physio terms, we call this Intra-Abdominal Pressure (IAP).
Think of your torso like a plastic bottle of sparkling water:
- If the bottle is open and empty: You can crush it easily with your bare hand.
- If the bottle is sealed and full of pressure: It becomes incredibly rigid and almost impossible to crush.
By holding your breath and bracing during a heavy movement, you turn your torso into that sealed, pressurized bottle. This creates a rigid cylinder of air that supports your lower back from the inside out.
How to Do It:
The "Punch in the Gut" Technique
To do this safely and effectively during a lift (like a squat), follow these steps:
- Breathe into your belly: Take a deep breath through your mouth, but direct the air down into your stomach and sides, not your chest. Your waistband should feel tight.
- Hold it and brace: Close your throat to keep the air in. Now, tense your abdominal muscles as if someone is about to punch you in the stomach.
- Do the lift: Keep that breath held and your core perfectly tight as you lower down and push back up.
- Exhale and reset: Once you are past the hardest part of the lift (near the top), exhale. Take a fresh breath, re-brace, and start the next repetition.
Where Do Weightlifting Belts Fit In?
A common myth among gym-goers is that a lifting belt is like a medical brace that mechanically holds your back in place. It doesn’t. Instead, a lifting belt acts as a hard wall for your stomach to push against.
When you use the Valsalva maneuver while wearing a properly fitted belt, your expanding abdomen pushes hard into the leather. This feedback allows you to create significantly more internal pressure than you could on your own. It gives your core a rigid structure to brace against, making your spine even more stable.
When should I use a belt?
- Not for everything: You don’t need a belt for bicep curls, leg extensions, or light warm-up sets. Overusing a belt on light weights can prevent your natural bracing muscles from doing their job.
- Save it for the heavy stuff: Introduce a belt when you are performing compound lifts (squats, deadlifts, overhead presses) at a weight that feels challenging to you (typically around 80% of your maximum effort or higher).
But, Safety First!

The Valsalva maneuver can be highly effective for bracing during heavy lifts, but it isn’t for everyone. Holding your breath under strain causes a temporary spike in blood pressure, so if you have high blood pressure, heart conditions, hernias, or pelvic floor issues, speak with a healthcare professional before using it.
For healthy lifters, the key is control. The Valsalva maneuver should be brief and deliberate—not an excuse to hold your breath for an entire set. Start with manageable weights, focus on proper technique, and stop if you feel dizzy, faint, or unwell.
A lifting belt can also help you brace more effectively, but it doesn’t replace good technique or smart programming.
The bottom line: Use the Valsalva maneuver as a tool, not a crutch. Learn to brace properly, lift progressively, and know when to breathe.
Ready to Lift Smarter?
Now that you know how the Valsalva maneuver, proper bracing, and lifting belts work together, it’s time to put that knowledge into practice. Start light, focus on your technique, and build your strength safely.
Brace. Breathe. Lift. Repeat.